(Note: The SoFoBoMo web site was closed down in the end of 2011, so I have changed the links of the PDF files to point to Scribd.)
Have you made a photo book? If you haven't then SoFoBoMo might be the perfect way to start: "SoFoBoMo is short for Solo Photo Book Month - a group event where a bunch of photographers all make solo photo books start to finish in 31 days." SoFoBoMo is good, as there is no pressure to perform, but plenty of support from others who are taking part. In 2011, SoFoBoMo run from 1st July to 31st August.
I have taken part three times, in 2009-2011. In 2010 I finished three photo books, which was a surprise as I wasn't originally sure I could make one.
Below are some practical instructions on how to make both a good-quality pdf file and a printed book with Blurb, using the Apple Pages software (and Ghostscript to generate pdfs and jpegs).
In 2011 things were different, as Viovio.com (which is sponsoring SoFoBoMo) offers direct upload of PDF files to their print-on-demand service. This seems to be a robust service. I tried it, with some hiccups - see the addendum at the end for some experiences.
From 2013 there is one photo book:
- Climbing hills and fells: Vuokatinvaara and Sallatunturit (18 MB PDF file)
- Blurb version available
- Blurb version available
- The Secret of Tremanskärr (SoFoBoMo 2011; 11 MB PDF file)
- Blurb version available
- Blurb version available
- From Pukaro to Valkmusa (SoFoBoMo 2011; 13 MB PDF file)
- Blurb version available
- Blurb version available
- Treasure Pond (SoFoBoMo 2011; 13 MB PDF file)
- Blurb version available
- Blurb version available
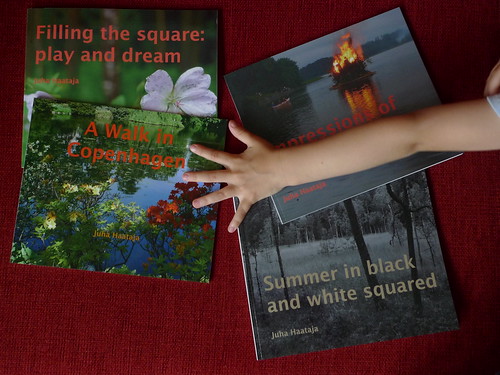
- Summer in black and white squared (SoFoBoMo 2010; 14 MB PDF file)
- Blurb version available
- Blurb version available
- Impressions of Midsummer's Eve (SoFoBoMo 2010; 4 MB PDF file)
- Blurb version available
- Filling the square: play and dream (SoFoBoMo 2010; 6 MB PDF file)
- Blurb version available
- A Walk in Copenhagen (SoFoBoMo 2009; 8 MB PDF file)
- Blurb version available
- Wetness of Spring (1 MB PDF file)
Of these, I like best the Midsummer book, which was done in two days: 12 hours to take photographs and a couple of hours to do the typesetting. It is rough, but also spontaneous.
Short instructions to making a photo book
To make a photo book from start to finish, all you need is the net. I have used both the built-in capability of Apple iPhoto, and the Blurb service for making physical photo books. Both work well, and after getting used to the software and workflow it only takes a few minutes to get a book ready and printed.
In 2008, I made a photo book directly with the Blurb software (BookSmart), but the drawback is you can only get printed books, not a PDF file. Nowadays I use the Pages software for typesetting the photo books, and Blurb for getting a printed copy.
I'm using a Mac so this doesn't work quite the same on a PC. Also note that I'm using Blurb in a bit of a convoluted manner. I do know that you can use specially-constructed PDF files (using InDesign) with Blurb, which may be easier for some.
First, I generate a PDF file from the Pages typesetting program using "Export..." and selecting the "Best" quality. The resulting PDF file is usually quite huge, 100-200 MB. For distributing a PDF version on the net, I compress the original PDF file using Ghostscript, giving a Unix command in Terminal:
gs -q -dBATCH -dNOPAUSE -sDEVICE=pdfwrite -sOutputFile=BK_low.pdf -dPDFSETTINGS=/ebook BK.pdfNext, still having the original "big" PDF file (export from Pages using "Best" quality), you can generate individual jpeg files of the pages of the document. I use Ghostscript at 300 dpi resolution, and generate separate jpeg files of the pages using the following Unix command in Terminal:
gs -dSAFER -dBATCH -dNOPAUSE -sDEVICE=jpeg -r300 -dTextAlphaBits=4 -dGraphicsAlphaBits=4 -dMaxStripSize=8192 -sOutputFile=page_%d.jpg BK.pdfNext, switch over to the BookSmart software of Blurb. Use full-bleed layout the whole way, and inport the pages from the jpeg images. (Just drag and drop them.) This takes a couple of minutes, and then you are ready to proceed with upload to Blurb and ordering of a printed copy.
Here a page numbering trick comes useful. You need to "align" the page numbering in Pages and on Blurb, especially recognizing that Blurb insists of having a Blurb copyright page at the beginning and another page with the Blurb logo at the end. (You can get rid of these by paying a bit more...)
I can use pages one and two (which don't have page numbers in the layout in Pages) as full-bleed images in BookSmart, and as there is the obligatory page in Blurb (which contains the Blurb logo etc.), I can start with full-bleed layout again conveniently from page three. So, the trick is to have in the beginning of the PDF file two unnumbered pages (cover and title page), and then start the page numbering from three.
This is quite easy, but unfortunately there was a bit of a learning experience on how to do this in Pages: to get no page numbers on the first two pages, and then start page numbering from three. Somehow I managed to do this but don't remember how. The easiest way is just to use previous documents as templates.
Update: I had to do this again in 2011, and the trick is to delete the page number field from the first pages, and then go on the third page to the inspector, and start the page numbering from three there, and not copy the previous settings. And you need to add the page number field somewhere to have it visible. For the next pages, you need to copy the settings from the previous section. This isn't intuitive but not too complicated either.
There are some problems in the old (iWork '08) version of Pages which I'm using, but not enough to upgrade to a newer version. For example, if you have deleted pages from the end of the book, and then cut-and-paste new pages, the deleted pages "magically" appear underneath the new pages. You need to watch out for this and delete the unwanted material.
One thing to note in Blurb is that it cuts a bit away from the edges, so you need to be ready for this in your original Pages layout. I made a quite "spacy" layout in Pages so for me this was not a problem.
When you have imported the pages into BookSmart and uploaded the document to the Blurb site, you can order a printed copy of your photo book. It only costs a couple of dozen euros, which is remarkable compared to what it cost to print a book in color in the old days.
I have ordered a copy of each of my 2010 SoFoBoMo books from Blurb, using the 25 x 20 cm softcover format. In 2009 this worked perfectly except that the paper was perhaps slightly too thin. In 2010 I upgraded to "premium" paper. Much to my surprise, I received the first of these books the next day after I got the "Order Shipment Confirmation" e-mail from Blurb. The result is good, better than in 2009, and that was already fine.
The premium paper was a good idea. Now all blemishes that there are are all mine. (Have to take better photographs...) What was surprising how close the end result was to what I was seeing on screen - colors are exactly what I was expecting them to be.
For those interested in on-demand publishing, Dpreview has a nice background article about Blurb. There I got an explanation for the fast delivery to Finland: there is a print location in the Netherlands.
Addendum: Experiences at SoFoBoMo 2011 (Viovio.com etc.)
Here are a few words about my SoFoBoMo 2011 project, a photo book titled Treasure Pond. It is available at the SoFoBoMo site, and also as a Blurb version. I have ordered a printed book from Blurb, but it will take some days until I can judge the quality.
Here are some lessons learned which I hope will benefit others, either doing a SoFoBoMo project or doing a photo book for other reasons.
First, one should think about the page size, or at least the aspect ratio of the pages. I forgot to check whether the VioVio.com service supports 25 cm x 20 cm format, and it didn't, so I couldn't use the service for printing my PDF file.
(As a sidenote, I probably would have needed to change the book format in Pages anyway, to help in getting the material positioned just right on the pages, as the Viovio.com service seems to trim more out of the page edges than Blurb.com.)
Related to the above point, one should think carefully whether you need a PDF file, or a printed book, or both. For SoFoBoMo, a PDF versio is sufficient, but I like to have a printed book to browse, so I need both. But this complicates matters.
If you don't need a PDF file, then there are a multitude of web sites and programs (iPhoto etc.) to make a photo book - plenty of choices for both a beginner and for a professional.
The same applies to PDF files as well, as long as you think carefully about the technical issues, such as maximun file size (15 MB in SoFoBoMo) and similar stuff. Also, when you are not limited to a physical paper size, you can get creative with the PDF format.
However, when you need both a PDF file and a printed book, you need to proceed with caution. The mistake I made was not looking at all the little details when testing out the Viovio.com service.
I uploaded my last year SoFoBoMo PDF file to the site, but didn't try out the whole workflow all the way to ordering a book. And so I didn't realize there was a mismatch between the paper size (aspect ratio) of my PDF file and the selection of book formats which Viovio.com supports.
And so when I had my new photo book ready as a PDF file, I got stumped at the end. But all turned out ok, because I had Blurb as a second option, well tested. A bit of extra work only.
Any other lessons? Well, it depends on what you aim for. My photo books are rather modest in scope and ambition, like a snapshot of work-in-progress captured on book pages. Thus, I have tried to make the workflow as easy as possible, and as automated as possible.
Maybe next year I'll try something more involved, like different formats for different pages of the book, and such things. But for now, I like this approach as it doesn't need much extra work. I just drop the photographs where they belong on the pre-formatted pages.
Well, here is one little invention I used this year. When I had the initial set of 362 photographs in iPhoto, I divided the photographs into iPhoto events, trying to categorize them into chapters for the book. This worked well, although I changed the plan a couple of times.
But typesetting was much easier after the division into events was done. This helped tremendously in eliminating the organizing work in Pages, and speeded up the work quite a lot. Of course, I had to make corrections in the plan, but nothing really drastic.
Additional information
- SoFoBoMo-related postings at Light Scrape
- SoFoBoMo site
- Blurb.com
- Viovio.com


No comments:
Post a Comment